3개이상의 데이터프레임 합치기 merge over 3 dataframes with indicators Programming/Python2023. 3. 3. 21:57
indicator를 포함하는 2개의 머지는 그냥 합치면 된다.
그런데, 3개 이상을 할려면 어떻게 해야 할까...!!!
이번에도 역시 chatGPT에게 물어봤다.
You can use the merge() function from the pandas library to merge three dataframes with the indicator option in Python. Here's an example code:
pandas 라이브러리의 merge() 함수를 사용하여 Python에서 표시기 옵션을 사용하여 세 개의 데이터 프레임을 병합할 수 있습니다. 다음은 예제 코드입니다:
import pandas as pd

# create three dataframes
df1 = pd.DataFrame({'key': ['A', 'B', 'C', 'D'], 'value1': [1, 2, 3, 4]})
df2 = pd.DataFrame({'key': ['B', 'D', 'E', 'F'], 'value2': [5, 6, 7, 8]})
df3 = pd.DataFrame({'key': ['A', 'B', 'F', 'G'], 'value3': [9, 10, 11, 12]})

# merge the dataframes using 'key' as the join key and specify the indicator option
merged_df = pd.merge(df1, df2, on='key', how='outer', indicator=True)
merged_df = pd.merge(merged_df, df3, on='key', how='outer', indicator=True)

print(merged_df)
In this example, we create three dataframes df1, df2, and df3, each with a column named 'key'. We then use the merge() function to merge the dataframes, specifying 'key' as the join key and 'outer' as the merge method (which includes all keys from both dataframes). Finally, we set the indicator parameter to True to include a column indicating the source of each row in the merged dataframe. The result is stored in the merged_df variable and printed to the console.
이 예제에서는 각각 'key'라는 열이 있는 세 개의 데이터프레임 df1, df2, df3을 만듭니다. 그런 다음 merge() 함수를 사용하여 데이터 프레임을 병합하고, 조인 키로 'key'를 지정하고 병합 방법(두 데이터 프레임의 모든 키를 포함하는 병합 방법)으로 'outer'를 지정합니다. 마지막으로, 병합된 데이터 프레임에 각 행의 출처를 나타내는 열을 포함하도록 표시기 매개 변수를 True로 설정합니다. 결과는 merged_df 변수에 저장되고 콘솔에 인쇄됩니다.
위와 같이 답변을 받을 수 있었고, 이번에는 번역툴을 파파고나 아닌 딥엘이라는 번역기를 사용해서 작업을 해보았다.
(나쁘지는 않은듯~)
하지만!!!!

코드가 먹히지를 않는다!!!!

---------------------------------------------------------------------------
ValueError                                Traceback (most recent call last)
<ipython-input-1-35e2c9af28c5> in <module>
      8 # merge the dataframes using 'key' as the join key and specify the indicator option
      9 merged_df = pd.merge(df1, df2, on='key', how='outer', indicator=True)
---> 10 merged_df = pd.merge(merged_df, df3, on='key', how='outer', indicator=True)
     11
     12 print(merged_df)

2 frames
/usr/local/lib/python3.8/dist-packages/pandas/core/reshape/merge.py in _indicator_pre_merge(self, left, right)
    762                 )
    763         if self.indicator_name in columns:
--> 764             raise ValueError(
    765                 "Cannot use name of an existing column for indicator column"
    766             )

ValueError: Cannot use name of an existing column for indicator column
'Search Stack overflow' 를 눌러서 바로 검색을 해봤다.
ValueError: Cannot use name of an existing column for indicator column
I need to work on a problem where I will have a data frame,say df, with Name & age & I need to generate another dataframe with name & gender in for loop & I need to merge the data f...
stackoverflow.com
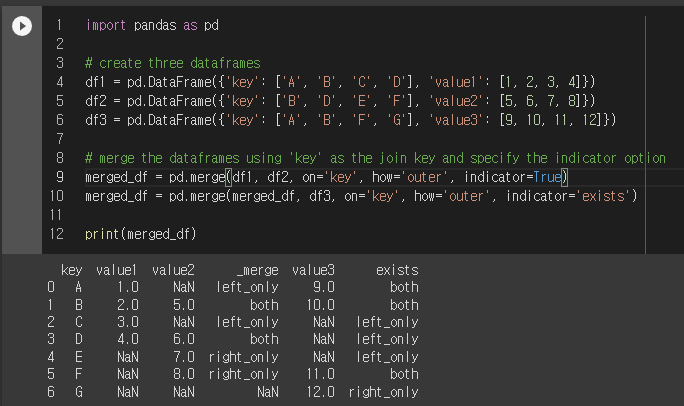
여기에서 살펴보면 indicator의 이름이 중복되어서 나온다는 것이다.
그래서 거기서에서 알려주는데로
3번째 하는 머지는 indicator='exists' 로 이름을 명명해줬다. 그랬더니 제대로 된 출력을 할 수 있었다.

import pandas as pd

# create three dataframes
df1 = pd.DataFrame({'key': ['A', 'B', 'C', 'D'], 'value1': [1, 2, 3, 4]})
df2 = pd.DataFrame({'key': ['B', 'D', 'E', 'F'], 'value2': [5, 6, 7, 8]})
df3 = pd.DataFrame({'key': ['A', 'B', 'F', 'G'], 'value3': [9, 10, 11, 12]})

# merge the dataframes using 'key' as the join key and specify the indicator option
merged_df = pd.merge(df1, df2, on='key', how='outer', indicator=True)
merged_df = pd.merge(merged_df, df3, on='key', how='outer', indicator='exists')

print(merged_df)
이를 응용해서 3개 이상을 'outer' 머지를 하고 싶은 경우에는 indicator=' ' 를 활용하면 된다.

indicator를 쓰게 되면 양쪽 자료에 있는 중복, 고유한 자료들을 표시할 수 있어서 추후에 연산작업이나 그래프로 나타내기가 수월하다.
감사합니다.
'Programming > Python' 카테고리의 다른 글
| 파이썬 소수점 자리 표기하는 여러가지 예제 (0) | 2023.03.10 |
|---|---|
| chatGPT 의 내용이 짤릴때??? 전 이렇게 해봤습니다~ (0) | 2023.03.08 |
| 일목균형표(Ichimoku Chart) 파이썬 코드(feat. chatGPT) (0) | 2023.02.24 |
| 로또 번호 생성기 ^^ (feat. chatGPT) (0) | 2023.02.23 |
| 키움 API 실시간 데이터 받은 후 체결창 데이터 시각화 해보기 (0) | 2021.09.11 |


